
What is an MVP Blueprint?
An MVP Blueprint is a set of documents that define the execution plan for building the initial version of your digital product. The term MVP comes from the lean startup's methodology's term Minimal Viable Product. It's basically the minimal requirements that are required to launch a product. The MVP Blueprint defines the scope of the MVP so that a software developer can properly estimate the level of effort needed to create the initial version of your product.
User Stories (You can read more about what user stories are here)
Acceptance Criteria (Requirements for a story's "doneness")
Wireframes (A visual narrative of how a user will interact with the product)
Note: Each user story should have a corresponding set of "acceptance criteria". Each wireframe can be used in multiple user stories. Each user story can reference one or more wireframes.

Lean Startup people may disagree with the need for wireframes this early, but I would argue wireframes help put more constraints and reduce the "unknown factor" for developers. And as they say, a picture is worth a thousand words.
Creating a Blueprint
Create a User Story Spreadsheet
Create Wireframes
First, you'll will need some tools:
Google Sheets or Excel for creating a User Story Spreadsheet
Balsimiq Mockups or Invision for Wireframing
1. Create a User Story Spreadsheet
We will begin by creating a spreadsheet with a list of "User Stories" and corresponding "Acceptance Criteria" in each row. This will act as constraints and allow us to define the scope of the product. It breaks work into manageable items that can be completed in a reasonable amount of time.
See read about the INVEST mnemonic to understand what characteristics make up a "good" user story.
We like to have the following fields in our spreadsheet:
Story Id - Numerical number that defines the unique identifier of the story
Name - This short name, usually a few words or less, that gives a quick description of the story
Role - See "The Format of a User Story" below
Description - See "The Format of a User Story" below
Business Value - See "The Format of a User Story" below
Acceptance Criteria - A simple list of things that the app must do before a user story can be marked as "done".
Priority - This is a number which defines the level of importance that a story has to the overall business value.
Story Points - This is the level of effort required (See Story Points). You'll need to include the developer(s) to calculate this number.
Remember: Each row represents a User Story. Each User Story has a list of Acceptance Criteria. We also assign story points to each story so we know how much "dev effort" is involved. No mythical man months here.
SEE THE EXAMPLE SPREADSHEET: SPREADSHEET
THE FORMAT OF A USER STORY (DESCRIPTION)
We have a specific format for creating a user story. It keeps it simple and easy for others to understand.
Format:
As a <Role>, I need to <Activity> so that <Business Value>.
Role - e.g. "Guest", "Admin", etc - The type of user of a system. This role defines the actor in the system.
Activity - e.g. "Log in to the system" - The action that the role must accomplish.
Business Value - e.g. "I can identify myself to the system" - This is the business goal that brings value and why the Activity is necessary. We use the business value to define the Priority (see spreadsheet fields above).
2. Create Wireframes
It's best to have a good initial set of user stories before beginning with wireframes. We like to use Balsimiq because it's fast, cheap, and easy. I also recommend using Invision to create wireframes. The advantage to using Invision is that it will also let you create hi-fidelity comps which will be critical to the end product experience. But in the beginning, it's more important to convey the basic workflow. When you start with just an idea, we believe form follows function.
The craft of wireframing is about story telling. It visually communicates an answer to the needs of the user. If you haven't done this before, find someone who can help you do this work. Google around and look for good examples of wireframing. There are loads of tutorials on YouTube as well. It's helpful to study other interfaces of popular apps to get ideas.
It's important to use callouts to define the behavior of the interface. It will help better describe the intended interaction of the interface.
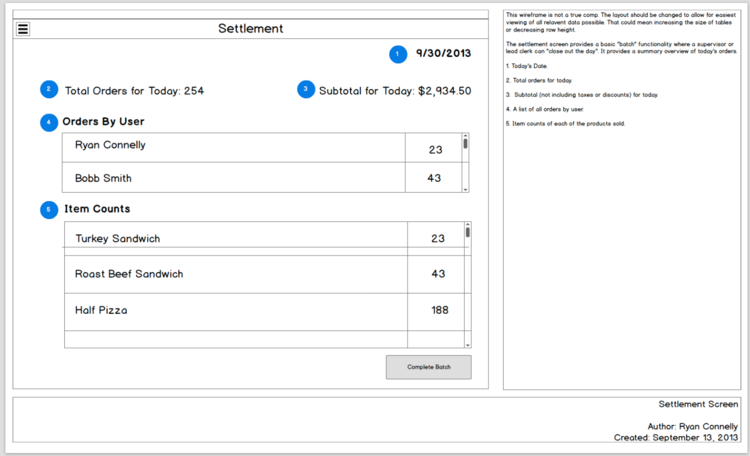
Example of callouts which link to text via a numbering system. It can provide a better description of the UI element or define behavior.
What about UX and Design?
The MVP Blueprint will help a Designer/UX craft a beautiful experience by first deeply understanding the the needs of the users. This is defined by the user stories. User Interface Design is truly a craft that requires experienced people and iterations to get right. But the MVP Blueprint should provide the rails by which your creatives can work.
By providing some basic requirements in an easy to consume fashion, you'll allow creatives to work more efficiently and confidently. They will be free to focus on delighting users.
Wrapping Up
The goal of the MVP Blueprint is to define the scope of the initial "Minimal Viable Product". It's about reducing risk by articulating constraints. Remember that constraints are key to building great software.